
I can’t believe it’s already January EIGHTH! How did that happen? Valentine’s day is coming right up, so for my first “real” post, I have some fun cookies for you to try. These are actually some of the very first cookies I ever tried when I was learning cookie decorating. I received a little tin of heart-shaped cookies as a gift, and inside was a recipe for powdered sugar glaze (similar to this one) and some simple instructions for drizzling and swirling the icing. I had so much fun doing them, and I’ve loved this method ever since. Give it a try, and if you have kids, they would LOVE to play around with these!

Bake a batch of cookies using one of our recipes or your own. Make a batch of frosting using one of our frosting recipes. One batch of frosting will cover approximately 3 dozen medium cookies.
Turn the finished frosting into glaze by adding 5 Tablespoons of water per batch of meringue powder buttercream, or 3 Tablespoons of water per batch of royal icing. Stir until smooth.
Divide glaze evenly into 3 bowls. Color one red, one pink, and one white. Pour half of each color into squeeze bottles. Cover bowls with plastic wrap and cap bottles when not in use to prevent drying.
| NOTE: We use a cookie scraper in our photos. If you don’t have one, a toothpick will do. |  |

With each design, start with a base coat of glaze. Choose a color and apply an even layer over the cookie. Keep this layer thin to prevent oozing when other colors are added.

To create multiple background colors, first pipe a dam using a squeeze bottle. Allow this to dry briefly, then glaze each section as described previously.
You’re ready to decorate! Before your base dries, finish your design using the following instructions – depending on the desired design.
Helpful Hint: Clean off the tip of your scraper or toothpick between swipes to avoid unwanted color blending!

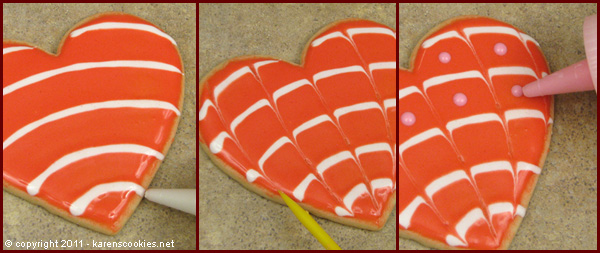
Draw a series of lines across the glazed cookie with a squeeze bottle. Then drag your scraper or toothpick alternately up and down through lines.

Draw concentric hearts, then drag lines from the outside to the center. For a different look you can drag from the center outward.

Try two designs on one cookie! Make flat dots by placing your dots while the base is wet, or raised dots by doing so after the base has dried.

Create a tie-dye look by first drawing lines across the cookie, then dragging the scraper in an outward swirl, starting from the center.

Hearts are fun and easy! Place dots onto your wet glaze using a squeeze bottle, then drag through the entire column in one motion.

Get creative with your hearts! Here we placed the dots around the outside before dragging through them. We ended with a stylish tail on the last heart.

For a fun free-form design, place a cookie on wax paper, then drizzle quick lines back and forth. These lines will lay flat against your background if done when wet, or will be raised if done after base dries.
This technique can be used to decorate several cookies at once. Place cookies close together to prevent waste, and have fun!

To make flowers, arrange groups of 4 dots. Make heart petals by dragging through each dot toward the center of the grouping. Finish each flower by placing a dot where the tails meet.
Draw a series of arching lines across heart. Drag your scraper downward through the lines, curving your paths toward the outside edges of the cookie. Finish off with a dot in each section.
| Tip: Keep your capped squeeze bottles upside-down in cups. This will keep the glaze down toward the tip and ready to use! |  |

Hopefully this helps you start thinking of all the countless ways you can apply these techniques to your own new creations.
Enjoy!


Hi Karen!
I’m so glad you already have a blog! And this post is so perfect for my next cookie project. =)I’m new to cookie decorating, and I found your online store through Sweet Sugar Belle’s blog. I also recently just became a customer… And I’m beyond excited to receive my supplies halfway around the world here in the Philippines. =) I’m looking forward to more fantastic posts. You’re a big help to beginners like me. =)
Best regards!
Thank you, Anna! So glad you found us. I hope your supplies get there really soon so you can get baking!!
This tutorial is the bomb! Thanks Karen. I’ve already referred my FB friends to it…..and some other friends too. Hopefully, your Valentines sales will go up by leaps and bounds after people see this. 🙂
Thanks, Pam!! Thanks for all of your referrals. YOU are the bomb! 😀
What an awesome tutorial. Thanks for all the tips. I was also referred to your store and blog by Sweet Sugar Belle’s blog. I can’t wait to start decorating for Valentines Day.
Thank you Shelley! Glad you found us!
How gorgeous! I love the designs!! My daughter’s bday is Valentines day, we may need to use your tuitorial to make amazing treats for school 😉 thanks!
Definitely try them, Katie! Your daughter would have fun doing them too. Fun day for a birthday!
This is fantastic, Karen! Your photo skills are pretty great, too. We will definitely be experimenting with the kids for Valentine’s! I went to Rush’s once for a pastry class and had a blast decorating with glazes. Can’t wait to try it on cookies! Still need to come in to see your store sometime, too. And bring on more recipes!
Definitely try it. It’s lots of fun!
Beautiful cookies! Thanks for the wonderful tutorial! I think I might be brave enough now to finally try this technique:)
Try it, Sue! 😀
Preciosas cookies y clarisima explicacion!!!
Bss.
Muchas Gracia, Maria!
Great tutorial and great ideas! I can’t wait to make Valentine’s cookies!
Wow, I didn;t even think of using a cup or mug to hold my containers of frosting. Glad I took a look. Thanks Karen.
Love those Valentines Cookies…those techniques are awesome!!
AWESOMELY BEAUTIFUL!!!!!
Me encantan, muchas gracias por las fotos!!!
It’s fabulous to have so many techniques in one easy-to-follow location. Many thanks!
Thank you so much everybody!! So glad you’re enjoying the blog!
Wow these cookies look great! I love how simple the decorating is. Thanks for sharing!
LOVE this… wanting to get started.. but for the life of my I can not figure out an easy way to fill my squeeze bottles.. Any tips?
Yes, filling the bottles is a challenge, but it does get easier with a little practice. Try to pour from 6-8 inches above your bottle if you can. The closer you get to the bottle, the more problems you have with big fat streams of frosting that don’t want to go in the top of the bottle. The challenge with pouring from higher up is getting your aim down, but it will get easier with practice! 😀
Gorgeous cookies! Speechless!
I am having trouble finding on your blog some good directions for actually preparing the icing for the cookies. I usually just use icing/powder sugar and water and vanilla/lemon with food colouring, but it’s never easy enough to work with to do your incredible designs!
Please direct me to your tutorial or recipe etc
Thanks!
Hi Tammy. You can find my frosting recipe on my web site here, and I have a video on how to make it here, and lots of tutorials on how to use it here. Hopefully those links will help. Let me know if you have any other questions! 🙂
you are not only an amazing artist… but an extemely generous person to share such beautiful ideas with us…thank you! God bless you!
Dear Karen, thank you so much for your tutorial and for your creations !!! Hope one day be came as you ;-). Gracias! Besos. Carol
Dear Karen, thank you so much for your tutorial and for your creations. Thanks for sharing!
I love these ideas! I’m wanting to make some for my man to take to work and share because I know he won’t eat them all, but I’m not sure how to transport them without messing up the frosting. Any suggestions?
Thank you for sharing your cookie wisdom!! 😉
Hey Karen. I’m new to the decorated cookie world. I made your meringue powder buttercream for the first time and went to work on the above cookies. It was so fun, and the icing was really good, however it never fully hardened. When I stacked the cookies into a container, I found them stuckk together the next morning. I was really excited to find the mp buttercream recipe bc I’m big on flavor but I really need something that dries completely. Did I not use enough mp? I used 3 tablespoons as it is very cold here right now. Thanks for the great tutorials by the way. What a wonderful blog you have!!
Wow. Am I ever thrilled I found your blog. SO HELPFUL for this amateur cookie decorator just getting into it. I’ve never considered myself artistic, but with these tips I can pretty much go hog wild on creating my own designs. Love, love, LOVE! Thank you!
You are going to think this is dumb,but how do you get the icing in the squirt bottles? I had a huge mess. Icing wouldn’t go in. I ended up piping a dam and then gently applying icing with a spoon. Did designs with bamboo hibachi sticks!
Links are broken 😦